Read-Only DAG
Pre-Steps
Create a React Component
Since Nice-Dag doesn't give a react component in default, you need to create a react component which can have a container showing DAG diagram.
import React from "react";

export function MyFirstDag() {
  return (
    <div>
      <div className="my-first-dag" />
    </div>
  );
}
Please give the container default height or width (depends on direction of the DAG diagram). For this example, we should set height of the container.
.my-first-dag {
  height: 400px;
  width: 400px;
}
Create initNodes list
To simplify the sample, we add a mock node list to the same file of the component. The node list is used to initiate the DAG diagram.
import React from "react";

const NodeData = [
  {
    id: "start",
  },
  {
    id: "task",
    dependencies: ["start"],
  },
  {
    id: "end",
    dependencies: ["task"],
  },
];

export function MyFirstDag() {
  ...
}
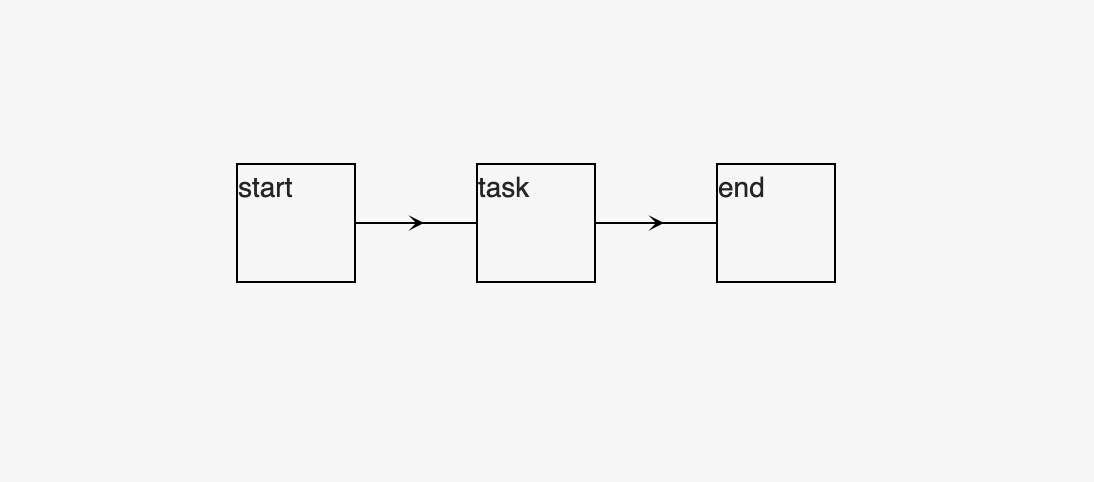
The sample shows a typical DAG diagram has 3 nodes, start, task, and end.
Once you apply the hook to your application, you can adapt the incoming of the node list, such that it can be in the manner of react component property or a list from react redux state.
Step 1: Add useNiceDag hook
To use useNiceDag, you need to import it from @ebay/nice-dag-react.
import { useNiceDag } from "@ebay/nice-dag-react";
After then, you can add the hook to the render function.
export function MyFirstDag() {
  //call useNiceDag
  const { niceDagEl, render } = useNiceDag({
    initNodes: NodeData,
  });

  return (
    <div>
      <div className="my-first-dag" ref={niceDagEl} />
    </div>
  );
}
There are two objects return by useNiceDag, of which one is niceDagEl, and the other is render.
Essentically, the dom operations is handled by nice-dag-core, we give a DOM host which can associate react component with pure DOM operations. niceDagEl is used to link the react component to the DOM elements created by nice-dag-core.
<div className="my-first-dag" ref={niceDagEl} />
Step 2: Render DAG nodes
Nice-Dag doesn't give any default render for node. To create a renderer for a node, you need to pass useNiceDag an function argument.
import { useNiceDag } from "@ebay/nice-dag-react";
...

function renderNode({ node }) {
  //todo: write you node render here
}

export default function MyFirstDag() {
  //call useNiceDag
  const { niceDagEl, render } = useNiceDag({
    initNodes: NodeData,
    renderNode, //pass renderNode function
  });

  return (
    <div>
      <div className="my-first-dag" ref={niceDagEl} />
      {render()}
    </div>
  );
}
Besides creating a renderNode function, you need to call render within the component JSX statement.
<div>
  <div className="my-first-dag" ref={niceDagEl} />
  {render()}
</div>
Actually, the container associating niceDagEL creates a DOM container which is used to host wrappers (with position, size) of DAG nodes. While, the render method returns a list of React components which is based on React.createPortal, assoicating DOM elements with node renderer.
Now, you can create customized node renderers.
import { useNiceDag } from "@ebay/nice-dag-react";
...

function SampleNode({ node }) {
  return (
    <div className="my-first-dag-node">
      <span>{node.id}</span>
    </div>
  );
}

function renderNode({ node }) {
  return <SampleNode node={node} />;
}

export function MyFirstDag() {
  //call useNiceDag
  const { niceDagEl, render } = useNiceDag({
    initNodes: NodeData,
    renderNode, //pass renderNode function
  });
  ...
}
To show the node renderer, here is to give a simple style.
.my-first-dag-node {
  width: 100%;
  height: 100%;
  border: 1px solid black;
}
Besides, you need to give the size of node by a function.
import { useNiceDag } from "@ebay/nice-dag-react";
...

function getNodeSize({ node }) {
  return {
    width: 60,
    height: 60,
  };
}

export function MyFirstDag() {
  //call useNiceDag
  const { niceDagEl, render } = useNiceDag({
    initNodes: NodeData,
    renderNode, //pass renderNode function
    getNodeSize, //pass node size control function
  });
  ...
}
Step 3: Adapt DAG diagram position
If you want to make the diagram position in the center of the container, you can call niceDag.center function within a useEffect hook.
import React, { useEffect } from 'react';
import { useNiceDag } from "@ebay/nice-dag-react";
...

export function MyFirstDag() {
  //call useNiceDag
  const { niceDag, niceDagEl, render } = useNiceDag({
    initNodes: NodeData,
    renderNode, //pass renderNode function
    getNodeSize, //pass node size control function
  }); //add niceDag as a return value

  useEffect(() => {
    if (niceDag) { //check if niceDag exists
      const bounds = niceDagEl.current.getBoundingClientRect();
      niceDag.center({
        width: bounds.width,
        height: 400,
      });
    };
  }, [niceDag, niceDagEl]);
  ...
}
Please check if niceDag exists before use the center api.
Finally, we can get the DAG diagram , as shown below.